Category: How To

  • Auto Forward Gmail Photo Attachments to Flickr

    As you probably already know I use Flickr to manage and archive all of my images. I usually get at least one email forward from friends or family with photos in it. Instead of downloading these attachments and re-uploading them to Flickr I’ve set up a filter in Gmail to auto forward all image attachments to my upload by email flickr address. Of course I set them all to private by default.

    Now whenever someone sends me photos they get saved (privately) in my Flickr. Keep in mind the Flickr upload by email feature can be flaky and isn’t designed for huge files or large numbers of files. I also do the same thing for documents and spreadsheets except I use Google Docs instead of Flickr.


  • How To Read Google Reader Using a Bookmark

    You can use Google Reader to create a bookmark for your browser that knows what you want to read and whether or not you’ve read it. I’ve done this for the sites I read most often. I click one bookmark and it takes me to the new stuff on those sites. Not the feed items but the actual sites. Click it again and it takes me to the next new item on the next site and marks the item as read. There is something to be said for actually looking at the sites themselves and not in a feed reader.

    Go to your Google Reader settings -> then goodies -> choose a tag that you’ve given to some of your feeds from the drop down menu -> drag it to your menubar -> click it. -> repeat


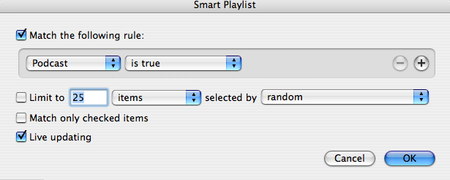
  • How To Have Continuous Podcast Playback in iTunes

    Ever find it annoying that iTunes stops playing after playing one podcast? What if you want to listen to Hype Machine or some other podcast with a bunch of short clips one after the other? Heres my solution:

    Just create a smart playlist of podcasts like this:

    Continuous Podcast Playback

    Now the ‘podcasts’ videos mp3s etc will playback continously.

    Enjoy.


  • Right Click Upload to Flickr

    If you’re using OSX Tiger and Flickr you might be interested in the ability to send images to Flickr by right clicking and hitting send. This is useful if you use Flickr for image hosting for your blog or you just want a really quick way to upload images to Flickr.

    • Download this automator action
    • Unzip and copy the Flickr.action file into ~/Library/Automator.
    • Open Automator (in your applications folder)
    • Add the Flickr Action to your workflow (you can search flickr and it should show up if you did #2 correctly)

    100854718 056E0Ff028 O

    • Authenticate it
        • Click File, Save As Plug-in (name it Save to Flickr or whatever) and choose finder in the drop down menu.

        100854704 Ec31F9Ab58 O

          • Now right click on an image(s) anywhere in the finder and choose Automator -> Save to Flickr (whatever you named it) and your images are sent off to Flickr with the tags/privacy settings you chose.

          100852466 C5Ef54B17F M

        This automator action can be used in a number of interesting ways. For example I made a timelapse with it. You can combine it with other automator actions to do whatever you need. You could use Automator to crop 100 images and then upload to them all to Flickr at the end. If you want to loop your automator actions you can use this.

        If you want to take some screenshots and upload them to Flickr use these shortcuts:

        • ⌘-shift-3 (whole screen)
          ⌘-shift-4-drag box (whatever you select)

        Images are then saved to your desktop as Picture 1, Picture 2… Now its as easy as right clicking them to upload to Flickr…

        Technorati Tags: ,


  • Blogger For MS Word

    B4w100px_1 Old news but still worth mentioning that Blogging is even easier than ever.  You can now use MS word to write your blogger blog posts.


  • Print Flickr Pictures

    Flickrhm_r1c1Txt_print_flickr_images

    Qoop Beta + Flickr Beta = Flickr picture books and posters.  I haven’t purchased anything from this service so I can’t speak to the quality/service levels but it looks awesome.


  • Automatically Geotag your pictures

    Wikipedia: "GeoTagging, also known as GeoCoding, is the process of adding geographical identification metadata to various media such as websites, RSS feeds or images. This data usually consists of latitude longitude coordinates, though it can also include altitude and placenames."

    Rbr_and_iLots of people have started GeoTagging their images on Flickr and then looking at them on Google Maps and Google Earth.   As of this post there are about 58 000 images on Flickr that have been "geotagged."  I thought this was pretty cool so I wanted to figure out how do it automagically.  How can I geotag my images without having to do it manually?

    If you want to manually geotag your images in Flickr check out Phillip Torrone’s how-to over at Make.  However if you want to know how to do it in a somewhat automated fashion read on mofo.

    I think this is as close as you can get to automatically GeoTagging your images in Flickr without actually having a GPS built into your camera.  The process works by combining the time-stamp of your image with the tracks from your GPS.  In other words the time your pictures were taken just needs to be synced with your GPS tracks.  I’ve only figured out how to do this on Windows so far. See the comments for an update on how to do it on a Mac.

    What you need:

    1. Digital Camera
    2. GPS Unit
    3. Flickr Account
    4. WWMX Location Stamper
    5. Expert GPS
    6. Flickr Importr
    7. Google Earth

    Here’s how you do it:

    1. Set the date and time on your digital camera.  Use the time on your GPS.
    2. Go out with your GPS set to record it’s tracks and take some pictures.
    3. Once you get home offload your pictures into a folder on your PC.
    4. Download the tracks from your GPS into Expert GPS.
    5. Save the tracks as a .gpx file.
    6. Open the WWMX Location Stamper.
    7. Add all the photos. Menu: Photos, Add Photos…
    8. Add Tracks. Menu: Tracks, Add Tracks (the .gpx)
    9. Highlight all the pictures and hit Apply tracks.  This inserts the Longitude and Latitude coordinates into the EXIF metadata of the images.
    10. Open the Flickr Importr.
    11. Add all the pics (notice the geotags automagically generated)
    12. Upload all the pics using Flickr Importr

    The interesting part is viewing your images in Google Earth or on Google Maps.  But first open Google Earth and open the .gpx file from your GPS.  This will overlay your tracks from your GPS overtop of the satelitte imagery in Google Earth.

    Now in order to view your own geotagged Flickr images in Google Earth click on the URL below courtesy of Geobloggers.
    http://www.geobloggers.com/googleEarthGeoRSS.cfm?sUsername=YOURFLICKRUSERNAME

    For example to view my Geotagged images in Google Earth I would use this URL:
    http://www.geobloggers.com/googleEarthGeoRSS.cfm?sUsername=TheLastMinute

    This will give you a kml file and just open it and it will launch Google Earth and take you to your geotagged pictures.  So you should now see your Geotagged images and your GPS tracks on Google Earth.  Keep in mind Geobloggers.com is getting popular very quickly so their servers might be a little unstable.

    When you get bored of looking at your own images use this link to view other people’s pictures in Google Earth:
    http://www.geobloggers.com/feeds/flickr.kml

    Here’s a list of videos that have been geotagged using del.icio.us:
    http://www.vlogmap.org/i/data/vlogmap_geovlogged.kmz

    You get the idea…  "the map is the interaface"

    What about other cool places in Google Earth?
    http://www.googlesightseeing.com/mapfiles/networklink.kml

    GmifTo view your images using Google Maps inside Flickr download Firefox, install greasemonkey, then install the GMIF extension and hit the GMAP button on one of your Geotagged Images.

    This whole process is different from just adding geotags on Flickr for one important reason.  This
    process actually adds the coordinates to the EXIF metadata of the image
    itself.  What this means is that the image itself will always contain
    those coordinates wherever it goes from now on.   It doesn’t just have
    tags on Flickr.

    So in the future when Google Earth is merged with Picasa or My Life
    Bits
    is built into Windows the metadata (gps coordinates in this case)
    stays with the pictures themselves and you’ll be able to do cool stuff
    with it.  Iphoto will probably still suck by then so don’t even bother…

    I figure it won’t be long before your communication/media capture
    device (the uber device) becomes location
    aware.  Your cell phone is already somewhat location aware because it
    know which cell phone tower its communicating with.  Eventually your
    uber device will do this entire process for you.  That is, it will add
    as much automatically generated metadata as possible at the point of
    media capture including GPS coordinates.  So you can be a huge nerd and do all this now or wait for the uber communication device.  I choose nerd.

    It’s funny that in order to make all of this work The United States Government Department of Defense (GPS), Microsoft (WWMX Location Stamper), Yahoo (Flickr), and Google (Google Earth and Maps) all had to play nice together.


  • Watch Video in iTunes

    Rocket_2This screencast from Rocketboom does a good job of explaining how to watch video blogs in iTunes. Direct link (~16 MB .mov) I did a really hack version of this about a week ago so I’m glad he did a better version. Looks like other people are getting into it as well

    Thanks for making a better screencast Andrew!


  • Video Blogs in iTunes 4.9

    Video_blog_in_itunesNerds: (me) Want to know how to plug an RSS 2.0 feed with enclosures (videoblog) into iTunes and watch them there?  FireAnt is the best video aggregator and it’s far more useful than this but I still think it’s cool that you can even do this…  Pete from Tinkernet figured this out and wrote the following:

    In iTunes 4.9 go under the ‘Advanced’ menu to ‘Subscribe to podcast…’ and paste in the URL of your feed.  It’ll do it’s iTunes magic and show you the feed, and start to download the most recent item and display the rest of the items.  Under the ‘Edit’ menu make sure you select ‘Show Artwork’ to display the part of iTunes that usually shows cover art.  In the little row of buttons on the bottom left of the iTunes window, the last one on the right will show the video playing in full-screen mode.

    I hope that makes sense… (Anyone wanna do a screencast of this?)

    UPDATE:  I made a really crappy screencast of this. (300 k file)  I compressed it down way too much but it does the trick…


  • del.icio.us links into Typepad

    There are tons of ways to get your delicious links into a blog but if you want to get the links to show up as a daily post in Typepad here’s how you do it:

    Go here:  (add your username)

    http://del.icio.us/settings/YOURUSERNAME/daily

    Click "add a new thingy"

    Fill out the boxes as follows:

    Delicious_links_1

    You can find your blog_id from the url from when you go to hit POST in Typepad:

    https://www.typepad.com/t/app/weblog/post?blog_id=N

    N is your blog_id.

    Sit and wait for that hour to occur.  See the previous post for an example of how it will look.